
1. NO TRIPOD? USE A LAMP!
Want to take a group photo but don’t have a place to set the camera? Just whip the lamp shade off a lamp and screw your camera onto the lampshade-holder.
The thread size of the bolt on a lamp shade is exactly the same size as the filter thread used on tripods, so your camera will easily attach.
Not only will your party and indoor pictures look better, but you’ll look like MacGyver in front of the group. Not bad. This tip doesn’t come in handy every day, but you’ll like the coolest photography nerd on the planet when the situation arises.
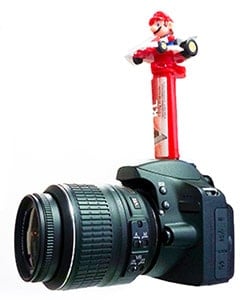
GETS ATTENTION OF THE KIDS AND YOU CAN GIVE THEM A TREAT FOR LOOKING AT THE CAMERA!
2. HOTSHOE PEZ DISPENSER FOR KIDS
Shooting photos of kids can be quite the feat. It seems like they are interested in looking at everything BUT the camera. I have two kids of my own, and I know that the only way to get them to smile and look at the camera is with a good bribe.
The perfect solution is to buy a simple PEZ dispenser on the hotshoe of your camera! The base of the PEZ dispenser is a tiny bit wider than a standard hotshoe, so you’ll have to trim it just slightly with a kitchen knife before the shoot.
Then, when the kids are being good and looking at the PEZ dispenser, you can have them come up and grab a little candy periodically during the shoot. It’s pure genius.
3. DAY TO NIGHT IN A FLASH
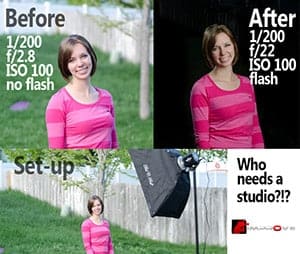
TURN YOUR FLASH TO FULL POWER!
Sometimes you’re out shooting portraits on a bright sunny day and the light just looks too… natural. I often find this is the case when shooting a wedding or engagement when I’m shooting at a park or other outdoor location and I get bored with the same lighting in every shot.
One trick that I really enjoy is to turn up the power on my flash to the max. This will, obviously, make the subject extremely bright. If you change your camera settings to expose for the subject, it will make the background look extremely dark because the flash didn’t hit it.
This makes it look like it’s night time even if it’s the middle of the day. Click here to read a full explanation of this technique.
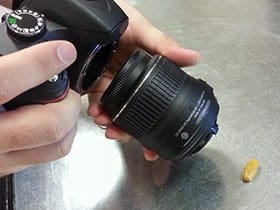
THIS PHOTO SHOWS THE LENS HELD OUT FROM THE CAMERA SO YOU CAN SEE WHAT’S HAPPENING, BUT YOU’LL WANT TO HOLD THE LENS RIGHT AGAINST THE CAMERA FOR THIS TO WORK.
4. REMOVE THE LENS FOR MACRO
This is the coolest camera trick I’ve seen in a long time. If you take off your lens and hold it in front of the camera, you get a macro lens! I was really skeptical about this, but I just tried it and it worked like a charm.
There are four things you need to know about using this trick: (1) Your camera won’t take a picture with the lens off unless you’re in manual mode. (2) The best focal length seems to be around 50mm, so either a 50mm prime or an 18-55mm kit lens would be perfect! (3) Obviously, you lose autofocus since your lens isn’t attached to the camera. Focus is achieved by simply moving closer to or further away from the subject, and (4) The camera can’t open up the aperture, so you’ll do it with your hand. On the back of the lens (the side you mount on the camera), move the little plastic slider piece that controls the aperture. If you look in the lens while doing it, you’ll see the hole open up.
If you want to take this a step further, you can buy a reverse lens mount for $5 or $10 which should sharpen up the images quite a bit since it will hold the lens more solidly. Also, be sure to use a tripod when doing this or any other macro photography. With such fine detail, even a tiny movement can destroy the sharpness.
5. DELETE TOURISTS FROM TRAVEL PHOTOS
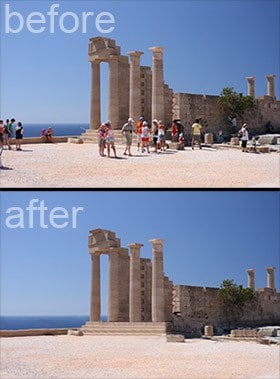
THIS LITTLE TECHNIQUE MAKES IT EASY TO GET RID OF THE TOURISTS IN YOUR TRAVEL SHOTS! (PHOTO FROM STOCK)
This is an awesome trick for travel photographers. Sometimes you’re at an amazing location, but there are people in the way of your shot. If you want to take a picture of a landmark and people are in your shot, you will likely spend the rest of your adult life cloning people out of the shot unless you try this technique.
Step 1: Set your camera on a tripod.
Step 2: Take a picture about every 10 seconds until you have about 15 shots, depending on how fast people are walking around.
Step 3: Open all the images in Photoshop by going to File > Scripts > Statistics. Choose “median” and select the files you took.
Step 4: Bam! Photoshop finds what is different in the photos and simply removes it! Since the people moved around, it fills the area where someone was standing with part of another photo where no one was there.
UPDATE: The “statistics” script mentioned here is only available in Photoshop Extended or in the Creative Cloud version of Photoshop; however, as someone mentioned in the comments, you can get a somewhat similar effect in recent versions of Photoshop Elements by going to Enhance > Photomerge > Scene Cleaner.
This tip is mentioned in an outdated article on lifehacker.
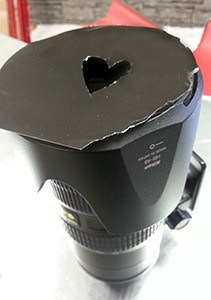 6. SHAPED BOKEH OUT OF PAPER
We all love to see beautiful bokeh in the background of our photos, but what you may not know is there is a really simple way that you can change the shape of the light bursts in your bokeh.
All you have to do is cut out a piece of black paper the size of the front element on your lens. Then, use a sharp kitchen knife or razor blade to cut a shape on in the middle of the paper. The shape should be slightly larger than a thumbnail or about the size of a U.S. nickel.
Keep in mind that you’ll only see this effect work if you are shooting with a large aperture, so a 50mm f/1.8 would be a great choice for this project. If you’re shooting at f/5.6 on a kit lens, you likely won’t see the effect at all.
No comments:
Post a Comment